

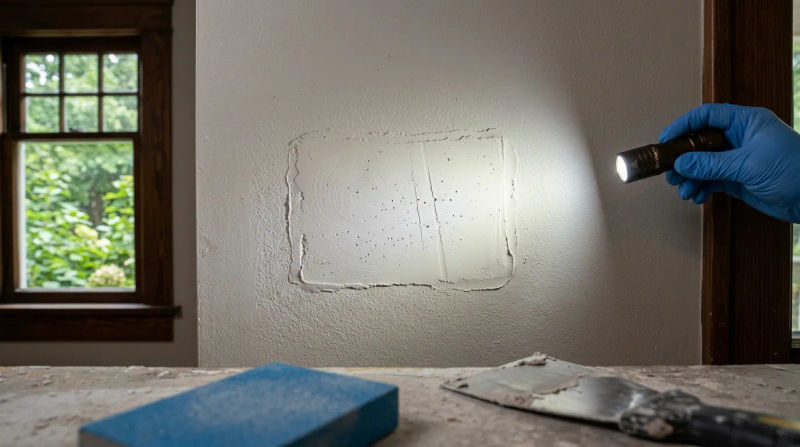
You’ve finally decided to rearrange the living room. As you take down that large piece of art that’s been on the wall for years, you’re left with the evidence: a collection of nail holes and maybe a small dent from a picture frame corner. No problem, you think. A little spackle, a quick sand, and a touch of paint, and it’ll be good as new. But a week later, you notice it. In the afternoon light, you can see the exact spot of every single repair - a slightly shinier, smoother patch that stands out against the rest of the wall.
This frustrating phenomenon, known as “flashing,” is just one of several tell-tale signs that a drywall repair wasn’t done quite right. From my 12 years of experience working on homes around Decatur, I’ve seen how these small imperfections can detract from a beautiful new paint job. Getting the prep work right is everything, and that’s especially true for drywall repair painting.
Common Signs and Symptoms
When a drywall patch is destined to show through the final coat of paint, the signs are often visible even before the topcoat is applied. A professional crew is trained to spot these issues during the prep phase, but a homeowner might not notice them until it’s too late. Here are the seven most common signs that your repairs will be visible later.
- Patch Flashing: This is the most common issue. The repaired area has a different sheen or gloss level than the surrounding wall. It might look shinier or duller, especially when viewed from an angle or in certain lighting.
- Visible Seams: You can clearly see the outline or edge of the drywall patch. It looks like a picture frame around the repaired area.
- Texture Mismatch: The patch is perfectly smooth while the rest of the wall has a subtle texture, like orange peel or knockdown. This is particularly noticeable in many of the homes built in the Decatur area during the 1990s and 2000s, which often feature sprayed textures.
- Sanding Marks or Scratches: Fine lines, swirls, or rough spots are visible under the paint, indicating the surface wasn't sanded smoothly or cleaned properly before priming.
- A Sunken or Concave Patch: The repaired area looks like a slight depression or divot in the wall. It’s a subtle flaw that catches shadows and draws the eye.
- A Raised or Bulging Patch: The opposite of a sunken patch, this repair is built up too high and sits proud of the wall surface.
- Inconsistent Color: The paint color over the patch appears slightly different - often lighter or less vibrant - than the surrounding area, even though it came from the same can.
What Causes This Problem
Understanding what causes these issues is the first step in preventing them. Nearly all drywall repair failures trace back to improper preparation, incorrect materials, or a rushed process. The hot, humid climate here in Decatur, especially during the transition from summer to fall in September, can make matters worse by affecting how materials dry and cure.
The Root Cause of Flashing and Color Issues: The primary culprit behind flashing is porosity. Drywall joint compound (mud) and spackle are far more porous than a previously painted and sealed wall. When you apply paint directly over an unprimed patch, the mud absorbs the paint’s binders and solvents at a different rate than the surrounding wall. This changes the way light reflects off the surface, creating a difference in sheen. The solution for how to stop patch flashing is straightforward: you must use a quality primer for repaired walls. Primer seals the porous patch, creating a uniform, non-absorbent surface for the topcoat to adhere to. This ensures the sheen and color will be even across the entire wall.
Why Seams and Edges Show: Visible seams are a result of poor “feathering.” A professional repair involves applying multiple, very thin layers of joint compound, with each layer extending slightly beyond the last. This creates a gradual, imperceptible transition from the patch to the existing wall. If the mud is applied too thickly or not sanded carefully at the edges, a hard line will remain.
The Challenge of Texture Matching: Achieving a perfect texture match after drywall repair is more of an art than a science. It requires specific tools, from aerosol texture sprays to hopper guns, and a deep understanding of how to blend the new texture into the old. Many homes in subdivisions like Stonecrest have a distinct sprayed texture that is very difficult to replicate with a putty knife and a can of spackle. A smooth patch on a textured wall will always be obvious.
Sanding Marks, Divots, and Bumps: These are classic signs of a rushed job. Sanding marks appear when the sandpaper grit is too coarse or when the dust isn’t completely wiped away before priming. Sunken patches occur because drywall mud shrinks as it dries. A single, thick application will shrink and create a divot. Our technicians prevent this with a standardized process of applying at least two or three thin coats, allowing for adequate drying time between each. This is critical during Georgia's late hurricane season, when high humidity can significantly extend drying times. Raised bumps are simply the result of applying too much mud and not sanding it down until it's perfectly flush with the wall.
When to Call a Professional
Some minor repairs can be handled by a handy homeowner, while others are best left to experienced professionals who have the right tools and processes.
Good DIY Projects:
- Filling a few small nail holes (pinhead-sized) before painting a room.
- Repairing a very small ding or scratch in a low-traffic, low-visibility area like a closet.
Even for these small jobs, I always recommend using a primer over the spot before painting to avoid flashing.
When to Call a Professional:
- Any patch larger than your fist: Larger repairs require more skill to feather, sand, and blend seamlessly.
- Repairs in high-visibility areas: Walls in entryways, living rooms, or any area with significant natural light will show every imperfection. A pro knows how to make the repair disappear.
- Texture matching is required: If your walls have any texture at all, even a subtle one, call a professional. Getting this right is what separates an invisible repair from an obvious one.
- Cracks or failing drywall tape: These signal a deeper issue than a simple surface ding. They need to be properly re-taped and mudded, a multi-step process that requires expertise.
- Large-scale drywall repair painting projects: If you have dozens of dings, scrapes, and settling cracks throughout your home, a professional crew can execute the repairs with a consistent workflow, ensuring a uniform, high-quality finish across every room.
Conclusion
A successful paint job is only as good as the surface underneath it. While patching a small hole in your drywall might seem like a simple task, the details make all the difference between an invisible repair and a glaring eyesore. The key takeaways are to never skip the primer, apply multiple thin coats of compound instead of one thick one, and pay close attention to feathering the edges.
Especially in our humid Decatur climate, giving materials the proper time to dry and cure is essential. Rushing the process is the fastest way to a flawed finish. Don't let a poor drywall repair undermine your investment in a fresh coat of paint. Addressing these issues correctly from the start will ensure your walls look flawless for years to come.
If you notice any of these signs on your walls, or if you're planning a painting project and want the prep work done right, contact a local painting professional for an inspection.